Navigate 1 – Screen Capture

Next: Include the following in your blog
Explore: Try out a screen casting tool of your choice.

I used Screen Record-Screen Recorder App it is for Mac OS. I’ve been using it for the past 3 years.  Cost is relatively inexpensive about $9.99.

Create: Create a screen capture sample lesson (under 2 minutes) in which you explain an educational concept for students.

I do a lot of screen recording since I teach animation/game design, graphic design, and photography. Here is a recent lesson I created using the Screen Record- Screen Recorder App that involves using Adobe Animate and Motion Tweening.

Messy Art Teacher Screen Record

The concept of screen recording for my classes is very important. This is used for students that get behind or need remediation on their own time. This motivates students to learn while I am there because otherwise, they need to watch the videos. My returning students I tend to do more video tutorials with them because I have another set of students that are new to the concepts. It works out well. It also is a record of what I have taught my students. I can also see if I need to adjust anything to make it more clear. It is an excellent tool.

Navigate 1 – Synchronous Vendor Market

What synchronous vendor application/tool did you select?

I chose Google Hangouts.

Using the application, what did you experience using the synchronous learning tool? Was the task easy? Challenging? Did the process present problems?

I found it to be easy once you get the hang of it. I don’t know that it is very clear on how to set up a Google Hangout at first. I had to speak with another teacher on how to schedule and watch the hangout.  I would want to create a video that gives exact directions for how to schedule and then meet up. I have not tried Google Hangouts on a phone or iPad. I have only used it on my desktop or laptop computer. The student participant was using a cell phone. The quality of the video recording was low res and pixelated. There was a lag when I tried sharing my screen.

Document the responses and general reflections on synchronous learning and the recorded session in your blog.

Link to Screen Recording Google Hangouts

Navigate 1 – Commercial vs. Open Source Virtual Classrooms

1. What are the strengths and weaknesses of open-source versus commercial software?
I’ve used Google Hangouts for open-source software when teaching and collaborating. Since it is open-source it is easy by just signing up for a Gmail account or if the school district uses Google for Education the students will have a Gmail account that they can use. It was not always the most straight forward getting the hangout to work. Probably the hardest part was figuring out how to meet online at the appropriate time frame. At times it could be laggy. With open-source, there are forums that you can post questions but no troubleshooting department to address issues.
I’ve taken a course using the Blackboard Collaborate for a graduate course. The instructions had multiple ways they could video connect with students via the Blackboard. They could use a desktop, or smartphone to hold conferences live. The conversations could be archived for future reference. It seemed much more integrated with the virtual classroom.

2. When would an open-source application take precedence over a commercial product?

I’ve used Google classroom and paid LMS. The problem I found that the districts did not want to pay for the added features in the paid LMS. It was beyond their budgets. It could be hard on the teacher when the district could no longer afford it and then switch to something else.

3. What are the issues when choosing between Open Source vs Commercial Software?

Everyone’s situation is different. Budgets are different, devices, and upload/download speeds can require that you take the time to test and demo each version.

Participate Reflection

  • Standard C: The online teacher plans, designs, and incorporates strategies to encourage active learning, application, interaction, participation, and collaboration in the online environment.

  • Standard E: The online teacher models, guides, and encourages legal, ethical, and safe behavior related to technology use.

  • Standard J: The online teacher interacts in a professional, effective manner with colleagues, parents, and other members of the community to support students’ success.

iNacol

  1. How has the Participate module prepared you to meet each standard listed above? For each standard, link to or provide specific examples from your work in Participate.
  2. What strategies will you take away from the Participate module and apply to your teaching? Explain why.
  3. What lessons were most beneficial for you? Explain why.

    The Participate module of the Effective Online Teaching Course has been helpful to prepare me for providing students with an understanding of the online environment. As an instructor, one should not assume that students will know the netiquette and consequences of their actions in the online environment. One of the strategies I would use from the beginning of teaching online is an AUP. An acceptable use policy allows all parties to know what is acceptable in the online classroom, similar to classroom policy and rules. All teachers do them, and it should also be extended to the online classroom. Providing an environment that students feel comfortable having these discussions is an important part of teaching.  The lesson on digital safety I felt was the most beneficial because I was able to create a powerpoint presentation on the topic. The powerpoint presentation I created that discusses the topic of digital safety would be utilized in going over the rules and consequences of students’ actions.

Participate 3 – Digital Health

Screen Shot 2019-11-26 at 12.39.19 PM1. How did you modify your technology habits?
Creating a calendar that makes one mindful of what they are doing during the week. I also would want to have a timer on my computer to remind me to stretch or sit up straight every 30 min. Making time to get away from the computer and unplug is very helpful.

2. What are the most proactive means of ensuring the most balanced blend of technology and well-being?
Set up your work environment on the computer for what makes sense for you. I had to put my computer at a position that required me to stand. I do not want to sit for too long. I also try and make sure to take breaks.

3. What can students and teachers do to make sure they get the most from technology while simultaneously safeguarding good health?
Make a conscious effort to think about how much time is good for sitting and try and work in breaks and exercise. Try and set up the computer to prevent fatigue for your wrist and back. I found yoga to be very helpful.

Participate 3 – Digital Safety and Security


  1. What is the most important step we can take in terms of ensuring our digital safety?
    Education and awareness of the issues that can be a problem when students are online. Developing this awareness will prevent scammers and hackers from getting access to your information and computer. The site Consumer FTC Gov Site has some great tips for staying aware of the problems that can occur from being online.
  2. What strategies can we take to help our students consistently keep digital safety in the forefront of their minds?
    Open discussions regarding digital safety are important. Having an open dialogue about the issue is really important than when students do have a problem they know what to do. Having these discussions on a regular basis and encouraging parents to discuss digital safety is key to having students feel like they have options and solutions to the problem. I would want to post an image of the poster below to have students remember some tips on digital safety.

Here is a link to view my Google Slides presentation I created based on this topic.

Digital Safety and Security

Participate 2 – Collecting Reputable Digital Resources

Post in your blog: Describe the walkabout experience and include the link to the list of social-bookmarked resources compiled during the exploration.

I decided to do some searching for reputable sites for my classes and organizing them in Symbaloo. I decided to give the bookmarking site a real try. I liked it a lot better then I thought I would. I decided to bring together sites that I use for finding images for presentations of artwork. I started collecting sites. I also found some new resources that included first-person interviews of contemporary artists. I installed the WOT app to my chrome browser as well to rate how reliable as the site was.

Here is the Symbaloo board that I created.
https://messyartteacher.symbaloo.com/home/mix/13ePGdTUiW

  1. What were the three most useful tools or resources resulting from the web walkabout?
    I tried to use sources that found that have reliable content creators. TedTalk, PBS, and major art museums. Major art museums would have researched and curated information on their sites. I’ve also used Google Scholar for looking for material I can cite in research papers. Is this a source reliable and how recent was the post made? Is it an opinion or factual? Who is the author?
  2. How can students be taught to safely collect tools and resources that can help them maximize their learning?
    The Evaluating Resource provided in the unit by the Baker University Library was helpful.
    I would recommend that they read the content and decide does it sound like it is a scholarly reliable source? Or is this not appropriate for a high school or college-level course assignment to cite. The database searches can be helpful, but I had to read the articles.
  3. What policies or procedures might need to be in place to make the above item possible?
    Providing a checklist like the one in the unit would be helpful for students to see if the source is reliable.  Here is a link from the ThoughtfulLearning site.  I would use that as an activity for my students.
    It would be helpful as the instructor to provide links to sites and sources that are reliable. I would create a video that explains my expectations for sites that would be a good place for students to visit. In my classes, I review and check the credibility of the person that I’m sharing the information with my students. For art history research students need to stay away from Wikipedia and ArtStory.

2.11 Episode Nancy Miller Grad School Reflection

0
On this episode, I decided to spend some time reflecting on my quarter in graduate school. Had an amazing time learning and growing as an artist. 
The Linda Warner Constantino – Illustration Professor provided a checklist that I’m using in my work from now on.
The 5 C’s. Are these things working in your artwork?
1. Color
2. Composition
3. Concept
4. Contrast
5. Craftsmanship
 
I’ve got several more interviews lined up with some more creative awesome people coming up, so stay tuned!
 
I need to keep that up and reminds me I need to practice drawing. It’s been a few days since I opened my sketchbook. Below are some of the channels of youtubers I mentioned that I learned from. Great stuff! Thanks for listening to this episode![
Great Youtube Channels to watch in Concept Art

Episode 2.09 Stephen Frink Underwater Photographer, Writer, and Publisher

Screen Shot 2019-07-23 at 3.24.22 PM

Screen Shot 2019-07-23 at 2.53.39 PM

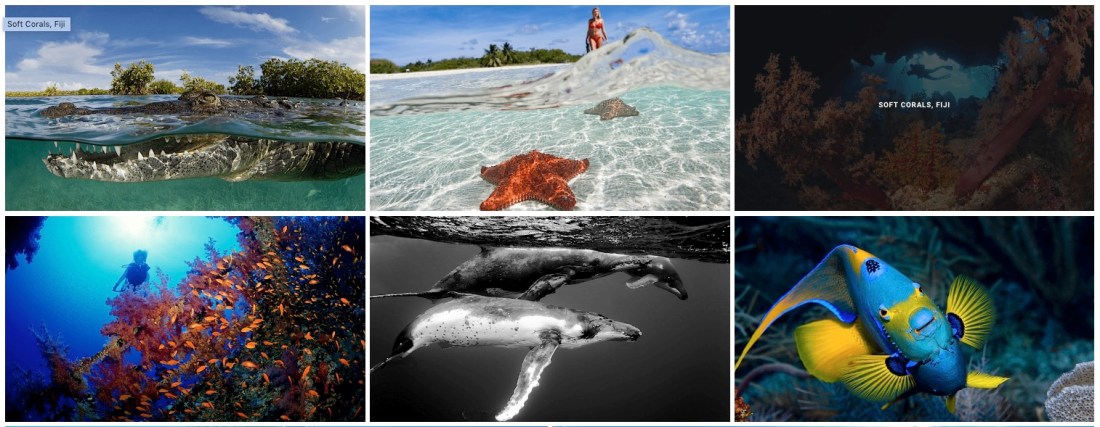
I’ve been lucky to have so many amazing artists on my podcast. Stephen Frink is a prolific underwater photographer that I met during my time at Scuba Diving Magazine. I worked there as the advertising designer, and Stephen was the Photo Editor and he traveled all over to write and take underwater photos of the areas. I am going to put his full bio below so you can read it.

Listen to his interview at My Creative Life.  Thank you for listening!

To see more of Stephen Frink’s work visit:

StephenFrink.com
Stephen Frink Facebook
Stephen Frink Instagram

About Stephen Frink
Stephen Frink is among the world’s most frequently published UW photographers, with a career spanning four decades. He arrived in Key Largo in 1978 to open a small studio dedicated to UW photo services, primarily renting cameras and processing E-6 slide film, but he soon began to receive assignments to photograph and write articles for the consumer dive publications of the day. He worked as a photojournalist for Skin Diver magazine for 17-years, covering much of the Caribbean, Bahamas, and Florida Keys for the publication. Subsequently he worked as the Director of Photography for Scuba Diving magazine. Most recently, and for the past 10 years, Stephen has been the publisher of Alert Diver Magazine, a beautiful coffee-table collectible magazine for the members of the Divers Alert Network.

Stephen teaches Masters level courses of Stephen Frink School of Underwater Digital Imaging in his home waters of Key Largo, Florida. Clients for assignment photography over the past 40 years have included Scubapro, Victoria’s Secret, Aqualung, Oceanic, Canon, Nikon, Subgear, Mercury Marine, Jantzen, Alcan Aluminum, R.J. Reynolds, Seaquest, Henderson Aquatics, American Express, Hanes, Club Med; as well as scores of resorts and live-aboard dive boats throughout the world. Rolex Watch Company has also engaged Frink for both endorsement campaign and product photography. He sits on the Boards of Directors of the Coral Restoration Foundation and the Florida Keys chapter of the National Marine Sanctuary Foundation, and is active with various ocean conservation initiatives.

Other Frink enterprises include a dive travel company, WaterHouse Tours and Reservations and a Seacam USA, the North American distribution of the Austrian underwater housing and strobe manufacturer.

Stephen lives in Key Largo, where he operates a studio and gallery at Mile Marker 101, Bayside.